Pages

12/11/11

Chocolate, PB, and Banana Smoothie {healthy, high protein, low calorie}

Chocolate, PB and Banana Smoothie

In an effort to get a jump start on my annual New Years Day resolution to eat healthier and lose weight, I discovered the best protein shake ever. Heck, it's a great shake - period. In fact, I hesitate to even tell you that this is a "protein shake" because most of the protein shakes I've tried usually have that funny aftertaste that always gives it away. You know, the kind you have to make yourself drink because it's good for you?

Well, enter this sinfully delicious and creamy masterpiece of a smoothie to the rescue! It's breakfast...it's dessert...it's healthy and low cal! How can a smoothie with chocolate, peanut butter and a banana be low calorie, you say? Well, I'll show you...

The "magic" ingredients to the best protein shake ever!!!!

Below is the nutritional data for everything but the banana which is approximately 105 calories for one that is medium size.


The big savings on calories and fat comes from the PB2 (45 calories vs the usual 200). There's also considerable savings using unsweetened almond milk vs. regular milk. And the Bluebonnet Whey Protein Powder has excellent stats as well, not to mention GREAT natural chocolate flavor. Lastly, I highly recommend Nancy's Organic Plain Nonfat Yogurt vs. other similar brands. Nancy's has considerable flavor (tart), whereas other brands lose their flavor when they lose the fat. {Update:  When I can't find Nancy's, I use Chobani's 0% Plain Greek Yogurt and am very happy with the substitution. I especially love Greek yogurt for it's amazing texture and very high protein content.}

So the following recipe will yield around 24 ounces (this is a HUGE and very filling drink) at approximately 343 calories, 38 grams protein, 3 grams fat, 25 grams of sugar (24 grams of the 25 coming from naturally-occurring sugars in the yogurt and banana). Feel free to halve the recipe if you like, however I prefer to have this as a meal replacement and I love getting the full 38 grams of protein in.

Chocolate, PB, and Banana Smoothie

Serves 1 (very large drink, approximately 24 ounces)

Approximately 343 calories and 38 grams of protein

Ingredients:
2 Tablespoons PB2
1 medium-sized ripe banana
5-6 cubes of ice

Place all ingredients in blender and blend until smooth and creamy.


Next, enjoy drinking the most delicious guilt-free, chocolatey, peanut buttery, banana smoothie!!!

I have one almost every day and it fills me up for hours!

10/29/11

Parmesan Crusted Chicken {Hellmann's Mayo Recipe}


Wow! This recipe by Hellmann's/Best Foods sounds too good to be true - with it's 4 ingredients, 5 minutes of prep time and 20 quick minutes of baking time - but it's totally true and totally amazing! Even my husband who is not a fan of mayo (a key ingredient in this recipe) absolutely raved about this dish and cannot wait to have it again. In fact, I wanted to take a picture of him enjoying it but he devoured it before I could grab the camera! Hellmann's, or Best Foods Real Mayonnaise as those of us on the west coast know it, really knocked it out of the park with this recipe.


Think juicy, moist, tender and incredibly tasty. Don't let the limited number of ingredients fool you. Their mayo gives it all the richness in flavor you could desire.


Yep - just these 4 easy ingredients, that's all it takes to get moist, delicious
Parmesan Crusted Chicken in well under 30 minutes.  Really!!


So amazingly moist and rich!


Parmesan Crusted Chicken
(recipe courtesy of Hellmann's/Best Foods, sponsored post)

serves 4

Oven 425 degrees F

Ingredients:
1/2 cup Hellmann's or Best Food's Real Mayonnaise
1/4 cup shredded Parmesan cheese
4 boneless skinless chicken breast cutlets, about 1 1/4 lbs. total weight or about 5 ounces per breast
4 teaspoons Italian seasoned dry bread crumbs

Place mayo and cheese in a small bowl and mix.


Lay chicken breasts on baking sheet (I line my baking sheet with parchment paper to make clean up easy) and spread mayo mixture evenly atop each.


Next evenly sprinkle bread crumbs atop each.


Place in oven and bake for 20 minutes or until chicken is cooked thoroughly and juices run clear. Tops will be browned and chicken will be incredibly juicy. You can also finish them off under the broiler for a minute or two to get them extra browned on top.

Season with a dash of fresh cracked pepper and sea salt, if desired.


Serve with a veggie like these delicious fresh french green beans that I steamed.


YUMMMMM!


8/20/12 Update:
I'm not kidding when I say I make this dish practically every week and have been since my original post almost a year ago. It's ALWAYS a hit. It's quick, inexpensive, reasonably healthy and amazingly delicious. A few things some of you have asked about:


  • I use chicken cutlets that I buy at Gelson's - the thin ones - or you can just butterfly a normal boneless breast and that will yield 2.
  • You can definitely use normal boneless breasts, just increase your cooking time by at least 10 minutes (original cooking time for thin cutlets is 20 minutes, so for thick boneless breasts cook them at least 30 minutes, or until they are no longer pink inside/fully cooked).
  • I've used light mayo (and just about every form of mayo there is) and it comes out fabulous every time.
  • Many of you have said you've experimented by using yogurt (Greek, plain, 0%, or light), and/or sour cream (regular or light) in place of the mayo and had great results. If you choose to substitute, especially with 0% Greek yogurt, consider adding some fresh squeezed lemon juice, garlic powder, and some extra salt and pepper to the mix to amp up the flavor.

This was a sponsored post. The opinions expressed herein are my own and were in no way influenced. This recipe is awesome!


********************************

If you like this recipe, check its healthier Paleo, Keto and Bulletproof cousin Parmesan Crusted Halibut!


*******************************

10/23/11

Shrimp Linguini with Garlic and Sun-Dried Tomatoes

Shrimp Linguini with Garlic and Sun-Dried Tomatoes

Talk about quick, easy and satisfying. This dish has it all. I used frozen peeled and deveined wild caught shrimp and whole wheat linguini - both cook very quickly. And I used jarred sun-dried tomatoes plus the oil they were marinated in so this dish came together in under 20 minutes.


Use the oil and seasonings from your
sun-dried tomatoes to cook the shrimp
One of the other things I really love about quick pasta dishes like this is that I can whip it up for lunch for one, or easily increase the ingredients to accommodate as many servings as needed. In this case I made enough for 2 for dinner.


Shrimp Linguini with Garlic and Sun-Dried Tomatoes

Serves 2 (recipe easily doubled)

4 ounces whole wheat linguini, cooked according to package directions, reserve small amount of pasta water
20 medium (41/50 count) peeled and deveined wild caught shrimp
2 large cloves fresh garlic, minced
1/2 jar of 8.5 ounce jar of marinated sun-dried tomatoes, tomatoes rough chopped, use oil for cooking
1 Tablespoon butter
sea salt
fresh cracked pepper
shaved Parmigiano-Reggiano cheese
fresh chopped Italian flat leaf parsley

In a large skillet over medium-high heat place half the oil from the jar of marinated sun-dried tomatoes plus butter. When heated add the garlic and cook for about a minute until garlic is fragrant, then add shrimp, sun-dried tomatoes and sprinkle with sea salt. Cook for approximately 1-2 minutes per side until shrimp is opaque and cooked through.


Add cooked pasta to skillet along with small amount of reserved pasta water and toss. Season with additional sea salt and fresh cracked pepper. Place in bowls and garnish with fresh parsley and Parmigiano-Reggiano and serve immediately with a small salad or green veggie.


Quick, easy and satisfying!


Yummy with shaved Parmigiano-Reggiano


10/9/11

All About Figs plus a Fig and Goat Cheese Stuffed Pork Loin Roast Recipe

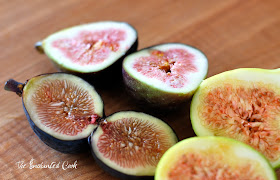
Black Mission Fig (solid black), Brown Turkey Fig (green and purple), Calimyrna Fig (green)

The incredible, edible...fig!  As delicious as it is beautiful.  As versatile as it is mysterious.

Brown Turkey Fig (back left), Black Mission Fig (front left), Calimyrna Fig (front right)

I was thrilled when the California Fresh Fig Growers Association offered to send me some fresh figs to play with. I've long been a fan of them.  Recently in the form of Pancetta Wrapped Figs, and Brie with Fig and Almond, and as a child when my mom used to make homemade fig bars - her version of Fig Newtons.

So what is a fig?
A fig is a fruit and it grows on a tree.  It's smooth on the outside and soft on the inside with lots of edible seeds. You can eat the whole fig raw, skin and all, or you can prepare figs any number of ways - from sweet to savory. Figs are typically small, about the size of a golf ball or slightly larger.  Although last year at Bristol Farms I saw figs the size of my palm!

Unusually large figs I saw last year at Bristol Farms!
Fig tree orchard on left, figs on right (photos courtesy of California Fresh Fig Growers Association)

What does a fig taste like?
Figs have a distinctive flavor.  They're mildly sweet without being overly so.  The darker figs, like Black Mission Figs are richer and earthier, while the lighter colored figs, like Calimyrna Figs are more buttery and nutty.  Dried figs are similar to the texture of prunes and taste somewhat like the inside of a Fig Newton.

Where do figs come from?
Did you know that California produces 100% of the United States' dried figs and 98% of our fresh figs?  And in CA there are 5 primary varieties of figs - Black Mission, Calimyrna, Brown Turkey, Kadota, Sierra Figs.  In most stores here locally in Southern CA, I generally find the first 3 fresh figs - Gelson's currently has fresh Black Mission and Brown Turkey Figs, and Bristol Farms has fresh Calimyrna Figs. The dried figs I usually find are Black Mission Figs.

Nutritional Info on Figs:
Figs are naturally fat free, sodium free and cholesterol free as well as being rich in antioxidants, fiber, potassium and calcium. They're an all-natural energy source making them perfect for an afternoon snack or a quick boost before a workout!

Brown Turkey Fig

Figs are a wonderous and versatile ingredient. This time I chose to use fresh (but you could also use dried) figs in a beautiful stuffed pork loin roast.

Fig and Goat Cheese Stuffed Pork Loin Roast

Serves 4-6

Oven 400 degrees F

Ingredients:
1 1/2 - 2 pound pork loin roast
2 ounces goat cheese
1 1/2 ounces pancetta or bacon, diced and cooked till crispy
1/2 shallot, minced
1 sprig fresh rosemary, plus extra for garnish
2 fresh or 3 dried figs (any variety), rough chopped
kitchen twine
2 Tablespoons grapeseed or canola oil (for high heat)
sea salt flakes (I use Maldon)
fresh cracked pepper

Place goat cheese, cooked and diced pancetta, minced shallot, leaves from one sprig of rosemary, a pinch of sea salt, and a bit of fresh cracked pepper in small bowl and mix.


Next add figs and gently mix.


Set aside mixture and prepare pork loin. Cut large slit or pocket in middle of pork loin roast being careful not to cut through the ends or filet. Place mixture inside the pocket.


Close up pork loin and hold together by tying several pieces of kitchen twine around. Then coat with sea salt and fresh cracked pepper.


Heat up oil in a skillet to high heat. Place pork loin in and sear all sides.


Place pork loin in baking dish and roast in oven for approximately 40 minutes or until internal temperature reaches about 140 degrees F. Remove from oven, cover with foil and allow to rest approximately 15 minutes or until internal temperature reaches 160 degrees F.


Slice, garnish with fresh rosemary and serve. Yum - rich and full of flavor!


For more recipes using fresh and dried figs, like the one below for Chocolate Covered Figs, visit: www.calfreshfigs.com and www.californiafigs.com.

Chocolate Covered Figs (photo courtesy of California Fresh Fig Growers Association)


7/30/11

Chicken in Creamy Lemon, Artichoke and Mushroom Sauce

Chicken in Creamy Lemon, Artichoke and Mushroom Sauce

Thin chicken cutlets in a sumptuous lemon, artichoke and mushroom sauce...Mmmm, just what I was craving! Recently, my husband and I were walking down the street in our neighborhood perusing menus at all the Italian restaurants looking for something to eat. Of course the "chicken in lemon sauce over pasta" dishes always draw my attention but I never order them for fear of the high fat content. So, no wonder when I was thinking of something to make at home shortly thereafter, the thought of a creamy lemon sauce kept creeping into my head.

The brightness and tang from fresh squeezed lemon juice really makes for a great sauce and complements chicken nicely. Marinated artichoke hearts and fresh mushrooms only added to the beauty, texture and flavor of this dish. I used a minimal amount of cream which made for a little bit of a thinner sauce, but I thought it was perfect. I also opted to leave out the pat of butter that is often used to finish sauces, which made it a little healthier, too.

Lastly, I chose to serve it with fresh steamed broccoletti with a  nice squeeze of lemon, instead of heavy pasta. It was a delicious meal that felt more decadent than it was. And the thin cutlets cook quickly so this dish was easy to put on the table in under 30 minutes.


Chicken in Creamy Lemon, Artichoke and Mushroom Sauce

Serves 4

Ingredients:
1 lb. organic chicken breast *cutlets (*see Cook's note) 
kosher salt
fresh cracked pepper
1 Tablespoon extra-virgin olive oil
6 ounces organic chicken broth
juice of 1 lemon
4 ounces heavy cream
6 ounce jar marinated artichoke hearts, drained
1 1/2 cups sliced fresh mushrooms
2 Tablespoons all-purpose flour

Season the chicken cutlets with salt and pepper on both sides.
*Cook's note:  If you can't find chicken cutlets, just buy regular boneless skinless breasts and cut horizontally through the middle to make two thin pieces.


Heat a large skillet to medium-high and add olive oil, then add the chicken and lightly brown on both sides - about 2-3 minutes per side. Remove from skillet and set aside.


Using the same skillet you cooked the chicken in, turn the heat down to medium and the add chicken broth and juice of the lemon. Stir and gently scrape bottom of pan to get all the little bits of flavor loose. Add the cream and stir or whisk to combine, then allow to come to a simmer. Sprinkle in the flour and stir continuously until sauce begins to thicken - several minutes.

Next add the artichoke hearts and mushrooms and allow to cook for a few minutes until the mushrooms start to soften slightly.  Last, add back in the chicken and allow to cook together for a few more minutes. Taste for seasoning and add additional salt and pepper if desired.


Serve alongside steamed vegetables. Or if you want to splurge a little - serve over a bed of whole wheat angel hair pasta along with a side salad.


7/18/11

Hobo Stew (Beef and Veggies in Foil Packets)


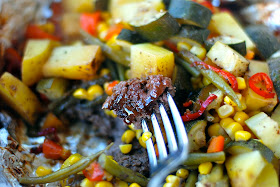
We used to make this when I was a kid - it was economical, easy, and versatile. We called it Hobo Stew, even though it's not a stew at all.  It's a sirloin patty topped with fresh veggies and seasonings, then sealed up in a packet of foil and grilled. Grilling it all together in these packets melds the flavors, caramelizes the beef, and allows all of the juices to stay in tact. It's simple to make, and simply delicious.

They're portable and you can make them in advance, so they're perfect for camping, or cooking out at the beach. When you're ready to cook, you just toss the packets on the grill. No turning, no watching. And at 30-45 minutes, you've got perfectly caramelized beef on the bottom and delicious steamed veggies on top. (Give a quick peek at 30 minutes by opening one of the packets and checking to see if the potatoes are tender. If not, leave on for another 10-15 minutes.)

Every time I make these I wonder why I don't make them more often - they're so darn good!

Hobo Stew (Beef and Veggies in Foil Packets)

Serves 4 (serving size 1 packet)

Grill Medium-High (about 450 - 500 degrees F)

Ingredients:
1 1/2 pounds grass fed ground sirloin
sea salt (I use Maldon Sea Salt)
fresh cracked pepper
Worcestershire sauce
2 cups fresh green beans, cut in bite size lengths
2 cobs fresh corn, cut from cob
2 red bell peppers, chopped
4 small Yukon Gold potatoes, cubed
2 zucchini, cubed
2 red fresno peppers, thinly sliced (optional)
extra virgin olive oil

Take 2 long pieces of aluminum foil and criss cross them, one under the other and place on the counter. Do this 3 more times, making a total of 4.

Divide the ground sirloin into 4 equal parts and make large, flat patties out of each. Place one patty in the center of each criss-crossed foil and season with sea salt, pepper and several dashes of Worcestershire sauce.


Top each with 1/4 of the veggies:

french green beans
corn off the cob
red bell pepper
Yukon Gold potatoes
zucchini
red fresno peppers

Season with sea salt, pepper, several more dashes of Worcestershire sauce and a light drizzle of olive oil:


Seal up the packets by bringing the four ends of foil up to the top together and folding over. Leave room inside the packets for air to circulate and steam. Place packets on the heated grill and leave for 30-45 minutes.

When done remove from grill and place each packet on a plate and serve.


This dish is so versatile you can tailor each packet to suit your picky eaters. You can use any veggies you like, in any quantities you like. I normally like to add cherry tomatoes to mine (although I didn't have any this time) and whatever veggies are in season.


7/5/11

Ina's Summer Garden Pasta

Ina's Summer Garden Pasta

Don't let the plain look of this dish fool you - it's absolutely delicious. And I mean delicious. Fresh, garlicky, and parmigiano-y...Wow. Ina Garten's recipes never disappoint.

And it couldn't be easier to pull together. The only thing is that you'll need to plan for macerating the tomatoes. Ina recommended 4 hours and that worked just fine. It's minutes to prepare the tomato mixture, then you just let it sit out at room temperature for the 4 hours. The last thing you do is cook the pasta, which takes about 3-4 minutes to cook to al dente, then toss it with the tomato mixture and serve.

Ina's recipe is meant to serve 6, so I halved it and it was plenty for 2-3 people, especially with a side salad. I also opted for whole wheat pasta and chose organic ingredients when possible. Lastly, I recommend splurging on Parmigiano Reggiano, it makes a huge difference in flavor.

Ina's Summer Garden Pasta
inspired by Ina Garten

Serves 3

2 pints organic cherry tomatoes, halved
1/4 cup good olive oil
3 large garlic cloves, minced
9 large organic basil leaves, julienned, plus extra for garnish
1/4 teaspoon crushed red pepper
1/2 teaspoon Kosher salt
Fresh ground pepper to taste
8 ounces organic whole wheat capellini or angel hair pasta (half of a 1 lb. pkg)
3/4 cup grated Parmigiano Reggiano, plus extra for garnish (if you can't find it already grated, just buy the block and you can pulse it in a food processor)

In a large bowl, place the cherry tomatoes, olive oil, garlic, basil, crushed red pepper, salt, and pepper, and toss to coat. Cover the bowl with plastic wrap and leave out at room temperature for about 4 hours.

cherry tomatoes, olive oil, garlic, basil, red pepper, salt and pepper
mix together, cover, and let set at room temp for 4 hours

When you're ready to eat, prepare the capellini pasta according to package directions in heavily salted, boiling water (no oil). I don't recommend adding oil to your water because it keeps the sauce from sticking to the pasta.

I love this pasta! I also use it in my Sesame Noodles recipe.

Once the pasta is done, drain and add to your tomato mixture. Then add the Parmigiano Reggiano and toss to coat. Taste for seasoning and add more salt and/or pepper if needed. Garnish with fresh basil and an extra sprinkle of cheese if desired.

YUM!!!!!